SSH Key Generation and Usage
To securely connect to servers and various services, a protocol called SSH was developed.
SSH allows connecting to services without passwords, for example, GitLab, GitHub, Sourcehut, and others. This way, you can push your code to GitLab without any hindrance.
SSH Key Generation
The process of creating an SSH key slightly differs depending on the platform used. Here, we'll note the steps for Windows and Unix-based platforms, i.e., MacOS and Linux.
Windows
Ensure that Git is installed on your computer! To check, open the Start Menu and see if you have either the "Git" folder or the "Git Bash" program. If both are missing, Git can be downloaded from here: https://gitforwindows.org/
Run the Git Bash program.
When the program starts, a console opens. On the command line, run the following command (**NOTE: Replace your_email@example.com with your chosen email.
It can be either your university or personal email**):
ssh-keygen -t ed25519 -C "your_email@example.com"
Press Enter.
The system will start generating an SSH key. If asked where to save your key, press Enter. Typically, the file is named as follows:
id_keynamehere
where keynamehere is replaced with the name of the service for which the key was generated.
NOTE! Make a note of the path where the file containing your key is saved! You will need to use this path later.
Next, you'll be asked to enter a password. You'll need to enter this password later when adding your key to the ssh-agent (which will be discussed later).
You can leave the password blank for convenience, but that's not recommended for security purposes. Enter the password and press Enter.
Now, open PowerShell with admin privileges. To do this, right-click on the Windows icon on your taskbar (bottom bar).
Run the following commands on the command line:
Get-Service -Name ssh-agent | Set-Service -StartupType Manual
Start-Service ssh-agent
You can now close PowerShell. Open it again, but without admin privileges (you'll find it where you found admin privileges before).
On the command line, run the following command (NOTE: Replace the file path in the command with the path to the SSH key you generated earlier!):
ssh-add c:/Users/YOU/.ssh/id_ed25519
Navigate to the folder where your SSH key was generated. There should be two files in the folder: id_keynamehere and id_keynamehere.pub. Open the .pub file and copy its contents.
The most important steps are done! Move on to the subpoint "Adding the Key to GitLab" to use your key in GitLab.
MacOS
Make sure you have XCode Developer Tools installed! To check, open the terminal (type "Terminal" in Spotlight) and type:
clang --version
If the console returns an error, copy the following command and run it on the command line:
xcode-select --install
A new window will open asking if you want to download the "developer tools". Press "install".
MacOS / Unix / Linux
Open the Terminal
On the command line, run the following command (NB!: Replace your_email@example.com with your chosen email. It can be either your university or personal email):
ssh-keygen -t ed25519 -C "your_email@example.com"
Press Enter.
The system will start generating an SSH key. If asked where to save your key, press Enter. Typically, the file is named as follows:
id_keynamehere
where keynamehere is replaced with the name of the service for which the key was generated.
NB! Make a note of the path where the file containing your key is saved! You will need to use this path later.
Next, you'll be asked to enter a password. You'll need to enter this password later when adding your key to the ssh-agent (which will be discussed later). You can leave the password blank for convenience, but it's not recommended for security purposes. Enter the password and press Enter.
Now, run the following command on the command line. (NB!: If the first command didn't work, you'll be given other options. This process depends on your operating system):
eval "$(ssh-agent -s)"
# If previous one does not work
sudo eval "$(ssh-agent -s)"
Run the following command on the command line (NB!: Replace the file path in the command with the path to the SSH key you generated earlier!):
# Linux
ssh-add ~/.ssh/id_ed25519
# MacOS
ssh-add --apple-use-keychain ~/.ssh/id_ed25519
You need to copy the contents of the generated .pub file. The file is saved in your designated folder. To quickly get the content of the .pub file, run the following command on the command line and copy the output:
cat ~/.ssh/id_ed25519.pub
The most important steps are done! Move on to the subpoint "Adding the Key to GitLab" to use your key in GitLab.
Adding the Key to GitLab
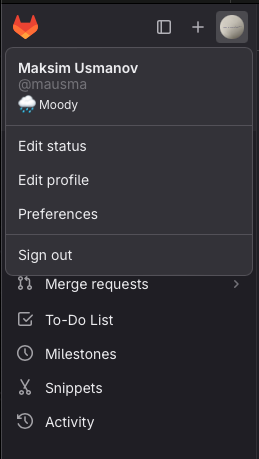
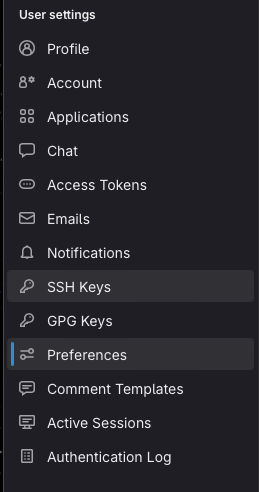
Go to the website https://gitlab.cs.taltech.ee. On the left side, you'll find a menu. Click on your profile and select Preferences.
Choose SSH Keys.
Click Add new key.

Copy the content of the .pub file under "Key". Name your key, for example, "My Computer", and press Add key.
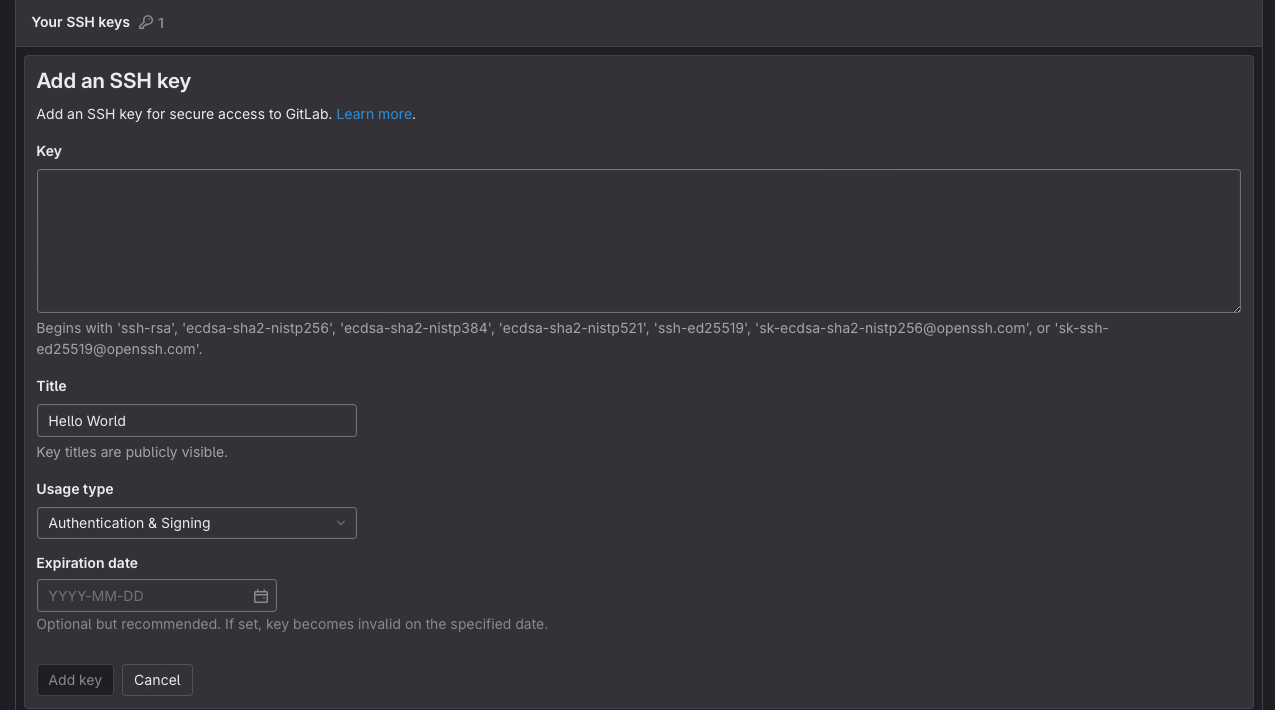
You've added your first SSH key to GitLab!